Even though it is about auto racing,
Win or Go Home (WoGH) still uses
many of the same mechanisms as other THW games. What is different about
them is that those other THW mechanisms have been stripped down to their bare
essentials. After all, a game about car racing needs to move fast.
The idea is that after a few minutes, the rules themselves sort of ‘disappear’
into the background, letting the players concentrate on the strategy of getting
their ride to the winner’s circle. With that in mind, let’s take a look
at just how the game works.
We’ll start with just four cars, which are pictured below. These are
the resin cars that are sold as an add-on to the rules, just like the resin
chariots for
Charioteer. They are a little cooler than the
counters provided in the game, but are not required for play. You can use
the counters provided, the resin cars in the photo, or die-cast cars.

The turn sequence in WoGH looks long, but goes
pretty quick. Anytime you roll dice during a turn, you are looking for successes.
A success is 1, 2 or 3 on each of the dice you are rolling. Compare your
successes to your opponent’s, and the person with the most successes is, well,
successful.
A turn consists of seven steps. They are:
1. Turn Lap Card –Adjust the Lap Tracker.
2. Turn Track Card (last turn of game is always
straightaway)
3. Pit (Straightaway only), Pass or Draft
4. Random Events
5. Passing
6. Reset Pack
7. Exit Pits
Steps 1 and 2 are pretty self-explanatory, so let’s skip
to step 3. Starting with the lead car in the pack, every player decides
if his car is going to go into the Pits (although only on a straightaway card)
to repair damage and gain more Bonus Dice (BD), try to Pass the car(s) ahead of
him, or Draft the car ahead of him.
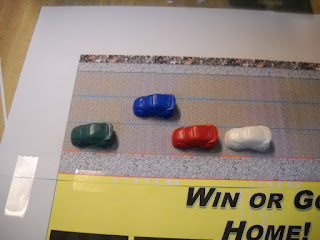
In the picture above, the Blue car has decided to try and
pass the Green car, which is in the lead. The Red car has decided to stay
where he is, and the White car is drafting the Red one. After random
events have been rolled for all cars, it is time for the Blue car to try and
pass. He moves into position:
and rolls all the dice he wants to use, looking for
successes. After the Blue car has
rolled, then the Green car rolls all his dice that he wants to use. If the Blue car scores more successes:
then the Green car is moved back one space and the Blue car
is now considered to be in the lead. In
phase six (reset pack) the Blue car is moved into the inside lane. IF, however, the Green car scores more
successes:
then the Blue car is moved back to where he started
from. Note that, if the Red car wanted,
he could now try and pass the Blue car.
If the Red car was successful, then the White car could try as well.
With that in mind, let’s look at the beginning and end of a
race. Just to keep things simple, all of
our drivers will have skills of 3, and the race will be 150 laps. The first lap of the race is how we set the
pack. To do that, each driver rolls
against the Straight skill (all drivers have three skills: Straights, Turns,
and Savvy) and adds however many Bonus Dice he wants to use (each car starts
with 6). Everyone is considered to be
making this roll simultaneously, so the order of cars doesn’t matter.
AND THEY’RE OFF! The Blue car starts out hard, using 5 of his six bonus dice for a total of 8 dice
(3 straight skill +5 bonus, which are shown in [brackets]). He rolls
1,3,5, [1,1,3,5,6] for 5 successes. The White car uses all six bonus dice, and still gets only 5 successes with a 1,2,5
[1,2,3,4,5,5]. The Red car uses 2 BD,
but gets no successes. That lets the Green car, with two successes slip in front of him. Meanwhile back in front, the White and Blue
cars total their successes, and both have rolled a total of 9. So, it comes down to a single die roll. Blue rolls a 1 and White rolls a 3. At the end of the first lap, the pack looks
like this:
The first lap card is turned, and 5 laps have gone by. That means there are 145 to go, and the race
is in a turn.
 |
| (These cards are the prototypes used in testing the
game. The ones in the actual product are
much nicer.) |
Now we roll Random Events for each car. White gets a BD, Blue gets no effect, and
both Green and Red gain BDs. Blue
decides to try and pass, while Green and Red stay where they are. Blue gets no successes! White rolls his 3 Turn skill dice plus and
extra for being on the inside lane. He
gets 2 successes and easily holds Blue off.
Green could now try and pass Blue on the inside, but decides not
to. The pack is reset into the inner
lane.
The next lap card says 20 laps have gone by, so now we’re
down to 125 laps remaining and are on a straightaway. All random events are “no effect” this
time. Blue decides to draft White, which
lets him pick up a BD, for a total of 1.
Now it’s time for Green AND Red to make their move on Blue.
Green pulls alongside Blue, and uses 2 BD. He rolls 1,1,3 [1,1] for 5 successes. Blue gets an extra die for being inside and
uses his 1 BD, but can only roll 1,2,4,5 [2] for 3 successes. Blue drops back
and Green could try to pass White but decides not to. Now Red makes his move. Red throws in 3 BD for a total of 6, but
rolls 6,6,6 [2,3,3]. Blue rolls 4 dice
again, but only gets a 2,3,4,6. Red
passes him, but without those BD it wouldn’t have happened!
10 more laps go down, and now Green makes his move on
White. This time though, they both roll
the same number of successes. That means
no one wants to give in, and now things go to the Trading Paint table. This is where Savvy comes into play. Both cars roll their Savvy score and however
many BD they wish to use. Once again,
both sides roll the same amount of successes and Green drops back to his
original position. If one car had scored
more successes, it would have taken the spot and the loser would roll on the
Out Of Control Table. That table
requires a Savvy roll and ALL of your Bonus Dice.
The race goes on, and finally we are down to the last
lap. The pack order looks like this:
Blue has 2 BD left, Green has 1, Red has 3 and White has
3. Once again the random events are all
no effect, and since it is the last lap, everybody who can pulls out to pass:
Hmmmm. Looks like Red
will be happy with either a second or third place finish, depending on how well Green does in front of him. White,
however, sees a chance to take it all.
Three wide coming for the checkered flag! This is racing! Green pulls up, and throws in his one BD;
after all, he has to get by Blue. Green
rolls 1,3,5 [3] for 3 successes. Blue
goes all in with both BD along with his inside lane bonus to get 6 dice rolling. Blue rolls 1,2,4,5 [5,6] for only 2
successes. Green takes the lead and Red makes his move!
Red goes all in too, and throws 1,2,4 [3,3,5] for 4
successes. Blue has no BD; the best he
can hope for is to trade paint with Red and shove him back. But Blue rolls 1,2,3,5 (remember the 1D6
bonus for being inside) and misses it by one again! Now here comes White!
But note that White is all the way in the outside lane. This is what we call in WoGH a Wide Pass. White is
going to lose 1D6 for being so far up the track. However, he wins any ties without going to
the Trading Paint table, as the two cars are not right next to each other. Even if both cars get no successes, White
will still advance.
White has 3 BD left.
Does he use them all to get around Blue, or try and ration them? White decides to only use 1 BD, and keep the
rest for the other passes he’s sure are coming up. White rolls 6,6 [5] for zero successes. However, if Blue gets zero White still makes
the pass. Blue rolls his 3 dice plus the
inside lane bonus and gets 3,3,3,3. He
holds off White and takes third place.
The race finishes looking like this:
That, in a nutshell is how to play Win or Go Home! We didn’t
talk about pit stops, yellow flags, or what happens when you get to the Out of
Control Table.
Remember, as Dale
Earnhardt, Senior once said, “You win some, you lose some and you wreck
some.” Just because you didn’t see it in
this race report doesn’t mean it can’t happen. We can look at some of those other things in a second installment.


